The Circarnival wedding happened last weekend--and it was beautiful! I'll be sharing images galore from the event, but in the meantime I wanted to share another DIY project I tackled for the wedding. These light up marquee letters were NOT the easiest. If you're only semi-committed to crafting I'd suggest not even trying this one. But, if you're down for the challenge, they're definitely awesome and would look great at circus, carnival, movie, Hollywood, or Vegas themed events to name a few. The project, including the lights, cost under $50.
What You'll Need:
-Foam core board (For my two letters I used 2 large pieces from Michael's. The letters turned out about 27" tall so I'm assuming I purchased 20x30 boards)
-Pencil
-An X-Acto knife
-Poster board (I believe I used two large pieces from Michael's)
-Scissors
-Hot glue & gun
-String of globe lights (I bought this set for $27.87 including shipping: http://www.amazon.com/dp/B009CZW7DW)
-Silver metallic spray paint
-Red spray paint
1. Trace out a letter on the foam core board.
Or, if you're me...decide you just "don't have time for this" and free hand it like a boss (read: moron). While I will admit that I just decided to "go for it" and free handed this, the smarter choice would be to print out a letter and trace it. For the record, however, if you're going to do letters as large as the ones I did, you'll need to have an industrial sized printer to print a letter large enough to copy. As for the font, I just googled "Circus font" and did my own interpretation.
2. Use the X-acto knife to cut out the letter.
This is going to take a while. Take a deep breath and just let it happen.
Using a ruler would have been a smart choice for a straight edge, but of course I didn't feel like getting up so I grabbed a random nearby magazine. I yam what I yam.
3. Repeat for the remainder of your letters.
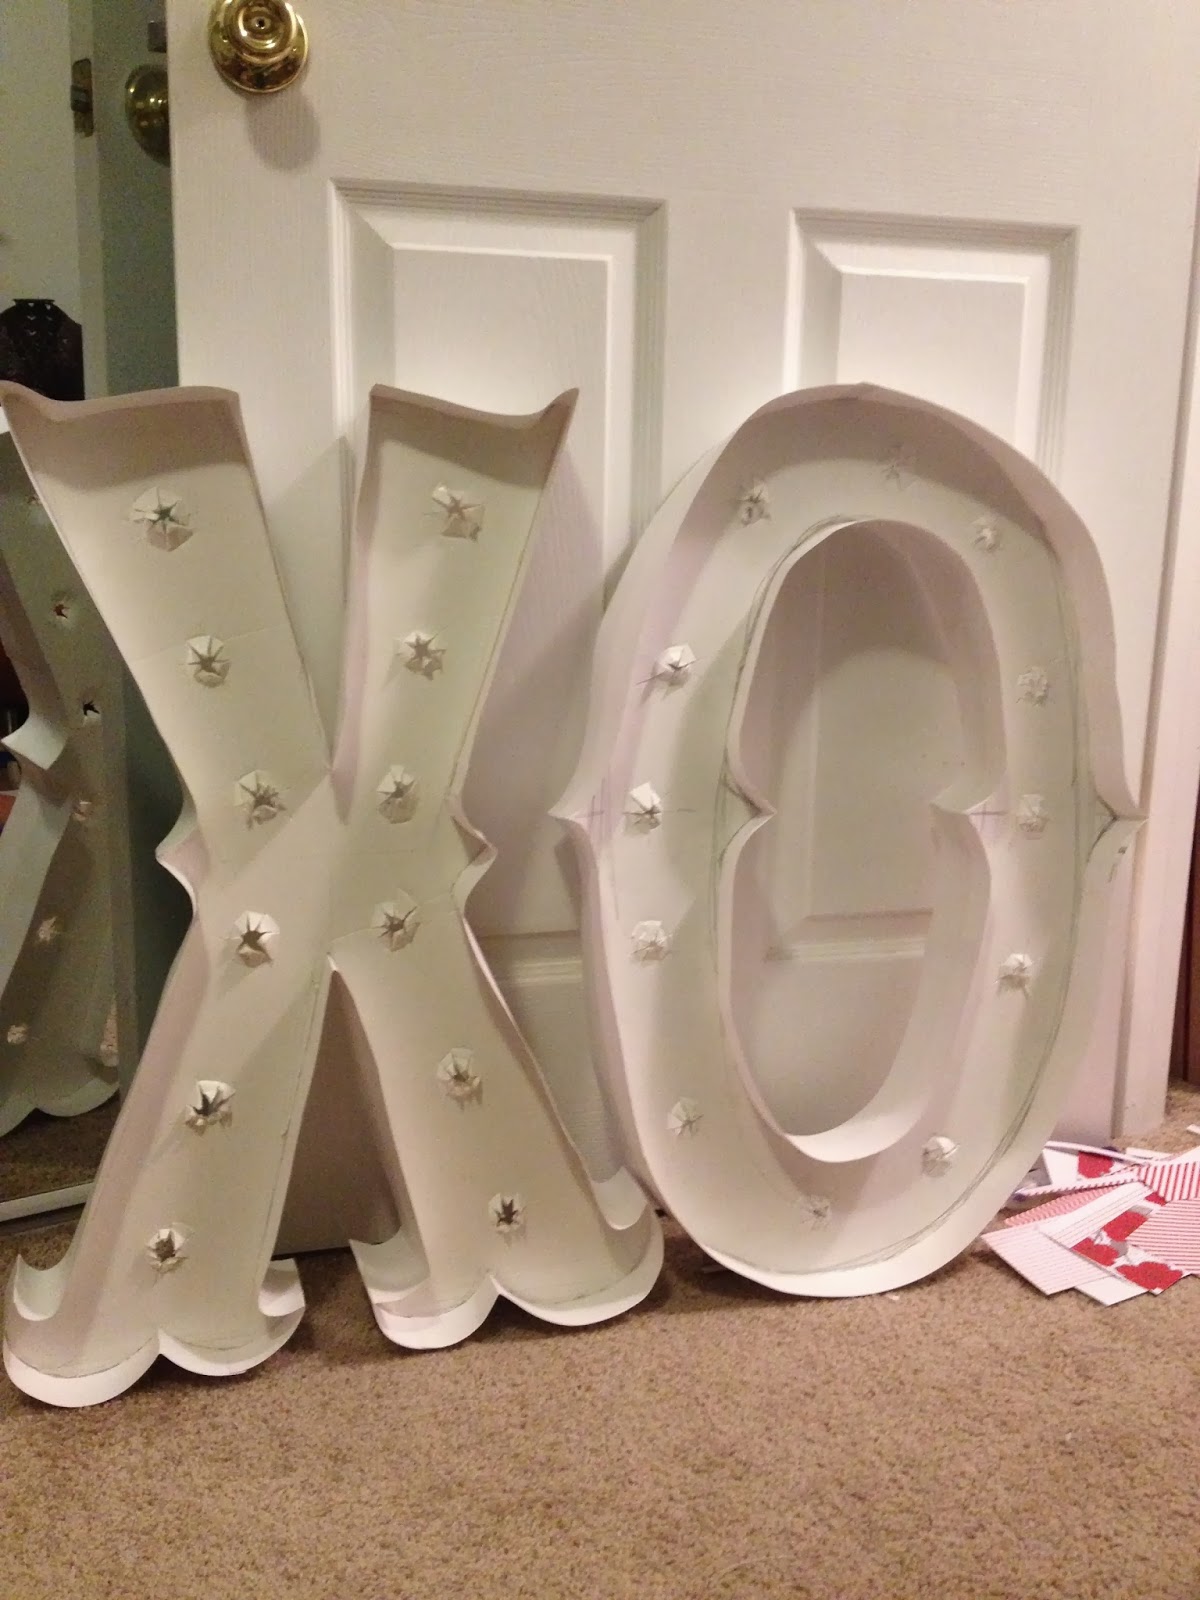
I spent a decent amount of time trying to decide what my marquee letters should say. I was making these for a circus carnival wedding, but I was unsure if the bride and groom would want to keep them so I didn't want to do anything too specific to the theme or to their names. I thought "XO" would be a good choice if they wanted to keep them but would also be versatile enough for me if didn't and I got stuck with them. With "XO" I could easily incorporate them into my home or into a future event's design. PLUS it was super appealing to only have to make two of these bad boys.
4. Plan out where the lights will go.
I had a set of 25 lights so I decided to use 24 to make it easier to divide in half and use 12 lights in each letter. This also worked out in my favor because someone in my clean-up crew at the wedding busted one of the lights and now I have an extra. Start with pencil and mark out where each light will go.
5. Use the X-Acto knife to cut out light holes.
I did a bit of research on this before diving in and saw that some people used some sort of a coin method for this. I tried this for about 20 seconds and decided it was not for me. Instead, I cut asterisk shapes with my X-Acto knife and then jammed my thumb through each hole to open it up. I also would stick the base of the light socket through to make sure this was going to work out and I wasn't wasting my time.
6. Cut strips of poster board.
I would suggest three-four inch strips, but as I mentioned before I was too lazy to actually get up and grab a ruler. I eyeballed it for the first strip and just made sure all subsequent strips were the same size.
7. Glue the foam core board letters to the center of the strips.
Line small sections of the outside of the foam core letters with hot glue and lay the poster board strips down as you go. Do too much and the hot glue will dry before you get there. Slow and steady wins this race. Ensure the poster board is in the center of the strips. Don't stress about it getting a bit messy--you'll be painting over this anyway.
This is the front and back. Notice there is equal amounts of poster board on each side. The foam core board is in the center.
8. Before proceeding, take a minute and try out the lights in your first letter.
This is optional of course, but for 1) you'll want to make sure you haven't screwed this up before you soldier on to other letters and 2) seeing one of these lit up will be serious inspiration to keep on keepin' on. Take them back out before moving to the next step.
9. Finish up those other letters.
If you decided to do eight of these you're probably wishing you did "XO" instead by now, aren't you?
10. Apply metallic silver spray paint to the letters.
This is another optional step, but I thought it was a nice touch to have the silver coming through in spots that were more lightly sprayed with red. It helped to give them that old feel. Do at least the front.
11. Apply red spray paint to the letters.
Do the front and back. I didn't take pictures of this step or the one before because I foolishly painted them outside in the dark. I just couldn't wait!
12. Put in the lights.
What I did, to avoid having excess light cord, was skip a hole and circle back round with the lights. For instance, I'd put the first light socket in the first hole, the second light socket in the third hole, and the third light socket in the second hole. Plan this out to ensure your cord will connect to the second light at either the top or the bottom. I did the bottom.
When you're finished, obvs, screw in the lights.
12. Celebrate, friend--you've done it!
Here's my finished project at the Circarnival wedding: