A few years ago I made my first DIY Snackadium for a Super Bowl party. It was big and awesome and delicious. Perhaps its only downfall? Not enough sugar! For last year's Super Bowl party I thought I'd mix it up a bit and do an all-sweets snack stadium...and make it bigger. Because, you know, why not?
Want to make your own? It's ridiculously easy. Here's how:
1. Find a large surface and cover as much of it as you would like to be occupied by your snackadium with foil. I used the round coffee table in my living room so party guests could snack while they watched the game. Last time around I used several baking sheets but I decided this time that it would be easier to make this is as large as possible if I used foil. It also made for very easy clean-up. (This picture was how big I thought I wanted the snackadium to be. As you'll notice later I ended up making it take up the entirety of the table. To achieve this I just added more foil.)
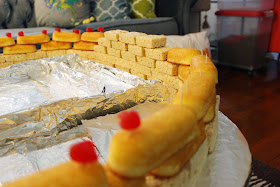
2. Start constructing the inner walls of the snackadium. The outer walls will be made of food. This is the inside section that will have messier foods and dips. I used three sheets of foil to make two ends and a center. I then used long pieces of foil along the sides to ensure a seamless transition and that there was no opportunity for leaks.
3. Use foil to divide out your end zones for dips.
4. Start building the outside walls. Pick a food that is sturdy enough to stack without falling over. I used a bulk-sized box of Rice Krispie treats and then built that up with a bulk supply of Twinkies, anchored with toothpicks. For a little somethin' extra I topped the tips of the toothpicks with fruit snacks. (This is where I decided my original plan wasn't quite big enough and covered the whole table with foil.)
5. Make a couple goal posts. I used a Rice Krispie treat base and then constructed the goal posts from yellow Gummy Bears, stuck together with toothpicks. This took a little while and was really the only quasi-difficult part.
6. Fill the area between your outer and inner walls with delicious snacks! Stack them higher toward the outer walls and slope down toward the "field." I used a variety of cookies, wafers, gummy bears, licorice, bananas, strawberries, fruit snacks, and peanut butter filled pretzels. Most everything here stayed separated for me just fine. If you are having a hard time keeping this neat, or if something you have added is juicy/slimy, make little foil walls to separate the different snacks.
7. Fill in your "field" with something green and your end zones with dips. I had a hard time thinking of a sweet that was green and readily available in a large amount. I settled on kiwi. It was 'aight, but it was not the easiest to work with. For the end zones I used a vanilla yogurt dip on one end and a chocolate dip on the other. Pour the end zone dips over the bases of the field goals to help keep them in place. For the yard lines I used the white candies from Good&Plentys. This got kinda gross by the end of the night, as the gooey kiwis started to melt the white candy coating... but it looked fine for most of the party.
8. Add your players. I used gummy bears with fruit snack helmets. Because I know nothing about proper football formations, I had the husband do this part.
9. Marvel at your creation! (And hope your dog is an absolute saint like mine who won't eat the whole thing up.)
10. Let people eat that thang!


No comments:
Post a Comment